
IN LOVING MEMORY
INSTRUCTIONS HOW TO TAKE IMPRESSIONS
Taking an impression is simple and takes just a few minutes. The kit contains a two-component silicone compound (white and blue) that reproduces the finest details of the skin, including fingerprint ridges and the natural texture of the hand. Once the two components are mixed, the compound hardens.
Although the process is simple and intuitive, it is important to follow the instructions closely.
BEFORE YOU BEGIN
Before preparing the compound, take a moment to assess the hands and fingers of the Deceased. Choose the areas where the natural skin texture and fingerprint ridges are most visible (do this before mixing the compound). Take 2–3 impressions from different areas, e.g. a fingertip, the palm, the back of the hand. Not every impression will be equally clear (e.g. elderly people and children have very fine fingerprint ridges). Taking several impressions increases the chance of choosing the pattern that best preserves the individual features. Impressions are taken in a completely non-invasive way, with full respect for the Deceased.

STEP 1 – PREPARE THE COMPOUND
-
Using the enclosed measuring scoop, take equal amounts of the white and blue compound.
-
Combine both parts and knead vigorously for about 30–60 seconds until you get a uniform colour without streaks.
⚠️ Once mixed, the compound gradually begins to harden, so take the impression without unnecessary delay.
-
Form a ball, flatten it slightly and place it on the box lid (or another flat surface).
STEP 2 – TAKE THE IMPRESSION
-
Note which area has the clearest texture (e.g. elderly people and children have very fine fingerprint ridges, in which case it is better to take an impression of the back or palm of the hand).
-
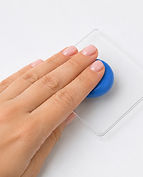
Gently press the compound against the chosen area of the palm, back of the hand or finger.
-
Press gently for a few seconds and carefully remove the compound.
-
If needed, take another impression from a different area of the hand or finger. Take 2–3 impressions in total so that we can choose the clearest texture.
STEP 3 – LET THE COMPOUND CURE
-
Leave the finished impression to cure completely.
-
The compound cures best at room temperature.
-
Do not leave impressions to cure in a cold room or at very low temperatures.
-
If the impression was taken in a cool room, we recommend moving it to a place at room temperature while it cures.
STEP 4 – SECURE THE IMPRESSIONS
Once fully cured, place the impressions in the numbered box and send them to the ETERNA studio.
EXAMPLES OF WELL-MADE IMPRESSIONS
